
 版权声明:本文为博主原创文章,转载请注明出处:https://twocups.cn/index.php/2023/08/05/54/
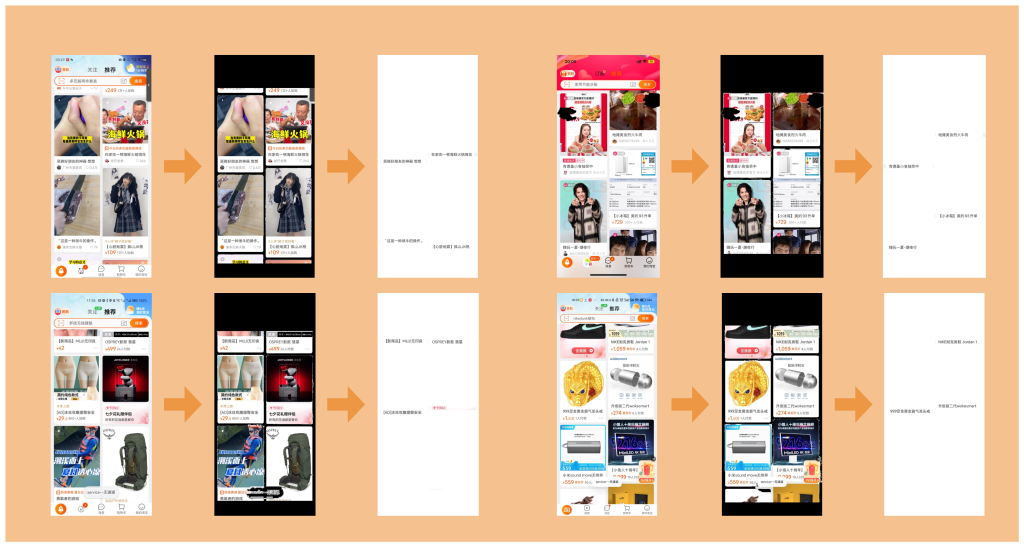
先上效果
实操
所有的文字提取方法都是由两个步骤组成:
- 确定文字对象位置;
- 根据位置图像识别出文字。
开头截图中的四个样例都是在定位标题位置(步骤1:确定文字对象位置),然后直接调用OCR(Optical Character Recognition,文字识别)完成图片预处理后的文字提取(步骤2:根据位置图像识别出文字)。
如果直接对最原始的截图进行OCR调用,会出现一个明显的问题:我能得到图片中的所有文字,但是我无法分辨哪些文字才是标题文字。其中,图片中的文字,以及APP本身的信息文字(例如购物车、我的淘宝等)都会增加标题文字提取的难度。
所以,我将原本由OCR来统一处理的文字定位和文字识别两个步骤拆分开来。而由我自己来完成图像预处理,最后将处理过后只剩标题的图片交给OCR来进行文字识别。
图像预处理
获取每一张卡片的独立位置
先观察,淘宝APP首页截图中卡片的共性。
- 所有卡片之间一定有间隙;
- 截图的中心点一定位于卡片间隙汇总。
只要能明确这两个特性,那么获取每一张卡片的独立位置的方法就很明确了。
- 以截图中心点作为起始点,通过一个BFS(深度优先遍历)找到所有卡片间隙的位置。
- 通过卡片间隙位置,我们可以通过反选得到所有卡片的独立位置。
- 通过卡片间隙位置的最小高度和最大高度,我们可以排除上方的搜索栏和下方的Dock栏的影响。
代码:
public static void main(String[] args) {
// 原图宽高
int originImageWidth = inputImage.getWidth();
int originImageHeight = inputImage.getHeight();
// === [预处理一阶段] 识别猜你喜欢区域,识别所有卡片 ===
boolean[][] guessGapPositions = new boolean[originImageWidth][originImageHeight];
// 围绕中心点做BFS,标记所有卡片间隙,同时标记猜你喜欢区域范围
Coordinate guessArea = getGuessAreaByBfs(inputImage, guessGapPositions);
// 在猜你喜欢区域范围内识别所有卡片
List<Card> validCards = new ArrayList<>();
for (int y = guessArea.pos1; y <= guessArea.pos2; y++) {
for (int x = 0; x < originImageWidth; x++) {
if (guessGapPositions[x][y]) {
// 跳过所有卡片间隙
continue;
}
// 从卡片左上角做BFS,获取完整卡片
Card card = getFullCardsInGuessAreaByBfs(guessGapPositions, new Coordinate(x, y), guessArea);
validCards.add(card);
}
}
// 卡片过滤
filterCards(validCards);
}
/**
* 围绕中心点做BFS,标记所有卡片间隙,同时标记猜你喜欢区域范围
* @param inputImage
* @param guessGapPositions
*/
private Coordinate getGuessAreaByBfs(BufferedImage inputImage, boolean[][] guessGapPositions) {
Queue<Coordinate> queue = new LinkedList<>();
boolean[][] visited = new boolean[inputImage.getWidth()][inputImage.getHeight()];
// 中心点一定位于猜你喜欢卡片间隙区域
Coordinate centerPosition = new Coordinate(inputImage.getWidth() / 2, inputImage.getHeight() / 2);
Color standardColor = new Color(inputImage.getRGB(centerPosition.getPos1(), centerPosition.getPos2()));
// 猜你喜欢区域的最小高度和最大高度
Coordinate guessArea = new Coordinate(centerPosition.getPos2(), centerPosition.getPos2());
// 中心点处理
queue.offer(centerPosition);
visited[centerPosition.getPos1()][centerPosition.getPos2()] = true;
guessGapPositions[centerPosition.getPos1()][centerPosition.getPos2()] = true;
// 上下左右
int[][] direc = {{0, 1}, {0, -1}, {1, 0}, {-1, 0}};
while(!queue.isEmpty()) {
Coordinate pos = queue.poll();
for (int i = 0; i < 4; i++) {
int xx = pos.getPos1() + direc[i][0], yy = pos.getPos2() + direc[i][1];
if (xx >= 0 && xx < inputImage.getWidth() && yy >= 0 && yy < inputImage.getHeight()
&& !visited[xx][yy]) {
// 获取像素颜色的RGB分量
int rgb = inputImage.getRGB(xx, yy);
Color color = new Color(rgb);
int red = color.getRed();
int green = color.getGreen();
int blue = color.getBlue();
// 判断颜色是否在指定颜色附近的范围内
if (Math.abs(red - standardColor.getRed()) <= guessGapColorRange &&
Math.abs(green - standardColor.getGreen()) <= guessGapColorRange &&
Math.abs(blue - standardColor.getBlue()) <= guessGapColorRange) {
queue.offer(new Coordinate(xx, yy));
visited[xx][yy] = true;
guessGapPositions[xx][yy] = true;
// 更新猜你喜欢区域的最小高度和最大高度
if (yy < guessArea.getPos1()) {
guessArea.setPos1(yy);
} else if (yy > guessArea.getPos2()) {
guessArea.setPos2(yy);
}
}
}
}
}
// 缩小猜你喜欢范围,避免像素吸附带来的影响
guessArea.setPos1(guessArea.getPos1() + 10);
guessArea.setPos2(guessArea.getPos2() - 10);
if (guessArea.getPos1() >= guessArea.getPos2()) {
throw new RuntimeException("猜你喜欢区域识别失败");
}
return guessArea;
}
/**
* 从卡片左上角做BFS,获取完整卡片
*
* @param guessGapPositions
* @param startPos
* @return
*/
private Card getFullCardsInGuessAreaByBfs(boolean[][] guessGapPositions, Coordinate startPos, Coordinate guessArea) {
Card resultCard = new Card(new Coordinate(startPos.getPos1(), startPos.getPos1()), new Coordinate(startPos.getPos2(), startPos.getPos2()));
Queue<Coordinate> queue = new LinkedList<>();
queue.offer(startPos);
guessGapPositions[startPos.getPos1()][startPos.getPos2()] = true;
// 右下左
int[][] direc = {{0, 1}, {1, 0}, {-1, 0}};
// 从起点开始,往下左右扩散
while(!queue.isEmpty()) {
Coordinate pos = queue.poll();
for (int i = 0; i < 3; i++) {
int xx = pos.getPos1() + direc[i][0], yy = pos.getPos2() + direc[i][1];
if (xx >= 0 && xx < guessGapPositions.length && yy >= guessArea.getPos1() && yy <= guessArea.getPos2()
&& !guessGapPositions[xx][yy]) {
queue.offer(new Coordinate(xx, yy));
guessGapPositions[xx][yy] = true;
// 更新卡片的宽度和高度范围
if (xx < resultCard.getWeight().getPos1()) {
resultCard.getWeight().setPos1(xx);
} else if (xx > resultCard.getWeight().getPos2()) {
resultCard.getWeight().setPos2(xx);
}
if (yy < resultCard.getHeight().getPos1()) {
resultCard.getHeight().setPos1(yy);
} else if (yy > resultCard.getHeight().getPos2()) {
resultCard.getHeight().setPos2(yy);
}
}
}
}
return resultCard;
}
/**
* 卡片过滤
* @param validCards
*/
private void filterCards(List<Card> validCards) {
Iterator<Card> iterator = validCards.iterator();
while(iterator.hasNext()) {
Card card = iterator.next();
int height = card.getHeight().getPos2() - card.getHeight().getPos1();
int weight = card.getWeight().getPos2() - card.getWeight().getPos1();
if (height * weight > 100) {
continue;
}
iterator.remove();
}
}
@Data
public class Coordinate {
private int pos1;
private int pos2;
public Coordinate(int pos1, int pos2) {
this.pos1 = pos1;
this.pos2 = pos2;
}
}
@Data
public class Card {
private Coordinate weight;
private Coordinate height;
public Card(Coordinate weight, Coordinate height) {
this.weight = weight;
this.height = height;
}
}
找到卡片中标题的位置
先观察,标题在卡片的什么位置?
标题往往在卡片的倒数第二行。即使倒数第二行不是标题,那也是卡片的有效文字信息。
而我们眼中的“信息行”,在图像中是由连续的像素行组成的。而连续的像素行想要显示出信息有一个必要条件:该像素行中的像素之间必有高像素色差。我们反过来想,如果没有高像素色差,那么说明这个像素行的颜色都是近似的,而近似的颜色是无法让用户肉眼看到信息的。
那么找到卡片倒数第二个信息行的方法也就很明确了。
- 从下往上遍历卡片的像素行,获取像素行的平均色差值数组。
- 先获取该像素行中每一个像素的红、绿、蓝分量,然后计算出一个平均分量;
- 再获取每一个像素的红绿蓝分量与平均分量的差值
- 计算出该像素行的平均红绿蓝差值
- 再次从下往上遍历卡片的像素行,找到第二个连续的高色差像素行范围。
代码:
public static void main(String[] args) {
// === [预处理二阶段] 提取出每张卡片的标题 ===
for (Card card : validCards) {
// 提取卡片中每行像素的色差
double[] diff = extractColorDifference(inputImage, card);
// 根据连续色差值,给标题染色
dyeingCardTitle(inputImage, outputImage, card, diff);
}
}
/**
* 提取出每张卡片的标题
*
* @param inputImage
* @param card
* @return
*/
private double[] extractColorDifference(BufferedImage inputImage, Card card) {
// 卡片位置
int startWeight = card.getWeight().getPos1();
int endWeight = card.getWeight().getPos2();
int startHeight = card.getHeight().getPos1();
int endHeight = card.getHeight().getPos2();
// 卡片中每行像素的色差
double[] diff = new double[inputImage.getHeight()];
// 从下往上遍历
for (int y = endHeight; y >= startHeight; y--) {
// 计算出这行像素的平均色值
long totalRed = 0, totalGreen = 0, totalBlue = 0;
for (int x = startWeight; x <= endWeight; x++) {
int rgb = inputImage.getRGB(x, y);
Color color = new Color(rgb);
totalRed += color.getRed();
totalGreen += color.getGreen();
totalBlue += color.getBlue();
}
totalRed /= (endWeight - startWeight + 1);
totalGreen /= (endWeight - startWeight + 1);
totalBlue /= (endWeight - startWeight + 1);
// 计算出这行像素与平局色值的色差
double totalDiff = 0;
for (int x = startWeight; x <= endWeight; x++) {
int rgb = inputImage.getRGB(x, y);
Color color = new Color(rgb);
long diffRed = Math.abs(color.getRed() - totalRed);
long diffGreen = Math.abs(color.getGreen() - totalGreen);
long diffBlue = Math.abs(color.getBlue() - totalBlue);
totalDiff += ((diffRed + diffGreen + diffBlue) / 3.0);
}
diff[y] = totalDiff / (endWeight - startWeight + 1);
}
return diff;
}
/**
* 根据连续色差值,给标题染色
*
* @param inputImage
* @param outputImage
* @param card
* @param diff
* @return
*/
private void dyeingCardTitle(BufferedImage inputImage, BufferedImage outputImage, Card card, double[] diff) {
// 根据连续色差值,找卡片标题的行范围
boolean flag = false;
int endY = -1, startY = -1;
for (int y = card.getHeight().getPos2(); y >= card.getHeight().getPos1(); y--) {
if (diff[y] < lineColorDifferenceThreshold) {
if (flag) {
endY = y;
continue;
} else {
continue;
}
}
if (!flag) {
flag = true;
for (; y >= card.getHeight().getPos1() && diff[y] > lineColorDifferenceThreshold; y--) {}
}
if (endY != -1) {
for (; y >= card.getHeight().getPos1() && diff[y] > lineColorDifferenceThreshold; y--) {}
startY = y;
break;
}
}
if (startY == -1 || endY == -1) {
return;
}
// 卡片标题染色
for (int y = endY; y >= startY; y--) {
for (int x = card.getWeight().getPos1(); x <= card.getWeight().getPos2(); x++) {
int rgb = inputImage.getRGB(x, y);
outputImage.setRGB(x, y, rgb);
}
}
}
@Data
public class Coordinate {
private int pos1;
private int pos2;
public Coordinate(int pos1, int pos2) {
this.pos1 = pos1;
this.pos2 = pos2;
}
}
@Data
public class Card {
private Coordinate weight;
private Coordinate height;
public Card(Coordinate weight, Coordinate height) {
this.weight = weight;
this.height = height;
}
}
输出预处理后的图像
由于卡片一定是类矩形,所有我们保存卡片的四个顶点的位置用于定位卡片即可。
现在我们有了卡片的左右宽度位置和标题的像素行范围,那么就可以在一张新的图片中输出该范围内的像素了。
代码:
/**
 * 图片序列化
 *
 * @param image
 * @return
 */
public static InputStream bufferedImageToInputStream(BufferedImage image) {
    try {
        ByteArrayOutputStream outputStream = new ByteArrayOutputStream();
        ImageIO.write(image, "jpg", outputStream);
        return new ByteArrayInputStream(outputStream.toByteArray());
    } catch (Exception e) {
        logger.error("vrobot bufferedImageToInputStream error {}", e);
        return null;
    }
}
OCR调用
OCR技术本身已经很成熟了,建议直接找个现成的OCR服务直接调用就好了,不用重复造轮子。当然,对OCR有兴趣的可以自己建一个OCR模型。
我直接用的就是阿里的OCR服务。
/**
* 通过OCR提取图片中的文字
*
* @param image
* @return
* @throws Exception
*/
public static String extractTextByOcr(InputStream image) throws ExecutionException, InterruptedException {
StaticCredentialProvider provider = StaticCredentialProvider.create(Credential.builder()
.accessKeyId("<Your AK>")
.accessKeySecret("<Your SK>")
.build());
AsyncClient client = AsyncClient.builder()
.region("cn-hangzhou")
.credentialsProvider(provider)
.overrideConfiguration(ClientOverrideConfiguration.create().setEndpointOverride("ocr-api.cn-hangzhou.aliyuncs.com"))
.build();
RecognizeAdvancedRequest recognizeAdvancedRequest = RecognizeAdvancedRequest.builder()
.body(image)
.build();
CompletableFuture<RecognizeAdvancedResponse> response = client.recognizeAdvanced(recognizeAdvancedRequest);
RecognizeAdvancedResponse resp = response.get();
String data = resp.getBody().getData();
JsonObject jsonObject = new JsonParser().parse(data).getAsJsonObject();
String content = jsonObject.get("content").getAsString();
client.close();
return content;
}
小波折
图像预处理方案
最终的图像预处理方案就是我上面说的,我会根据原截图生成只剩标题的图片。
而我最开始的图像预处理方案就简单的多:通过标题颜色识别标题对象。我观察到卡片标题都是深灰色的,所以我把卡片的标题颜色识别了出来。然后扫描整张截图,最终只留下与标题颜色相似的像素。并且,标题周围一般都是白色,所以我就进一步加了限制条件:留下周围存在白色像素,并且像素颜色与标题颜色相似的像素。
但是,这么做图片预处理有几个问题:
- 卡片的图片中也会存在符合条件的白底黑色文字;
- 卡片标题有少部分不是深灰的吗,例如云主题卡;
- OCR识别过于智能,导致会将模糊的图形识别成文字(例如会把间断的黑色像素点识别成省略号)。
这种图像预处理倒是可以识别出绝大部分的标题,但最大的问题是识别结果中多出很多标题文字之外的文字,所以最终还是废弃了。
截图存在像素损失以及像素吸附
根据手机型号的不同,截图尺寸约为 1000 × 2500。肉眼看到的原版页面和截图是非常相近的,但是如果细到每一个像素点,那么就有所不同了,像素点会存在损失以及吸附现象。
举个我遇到的有趣的例子(下图)。
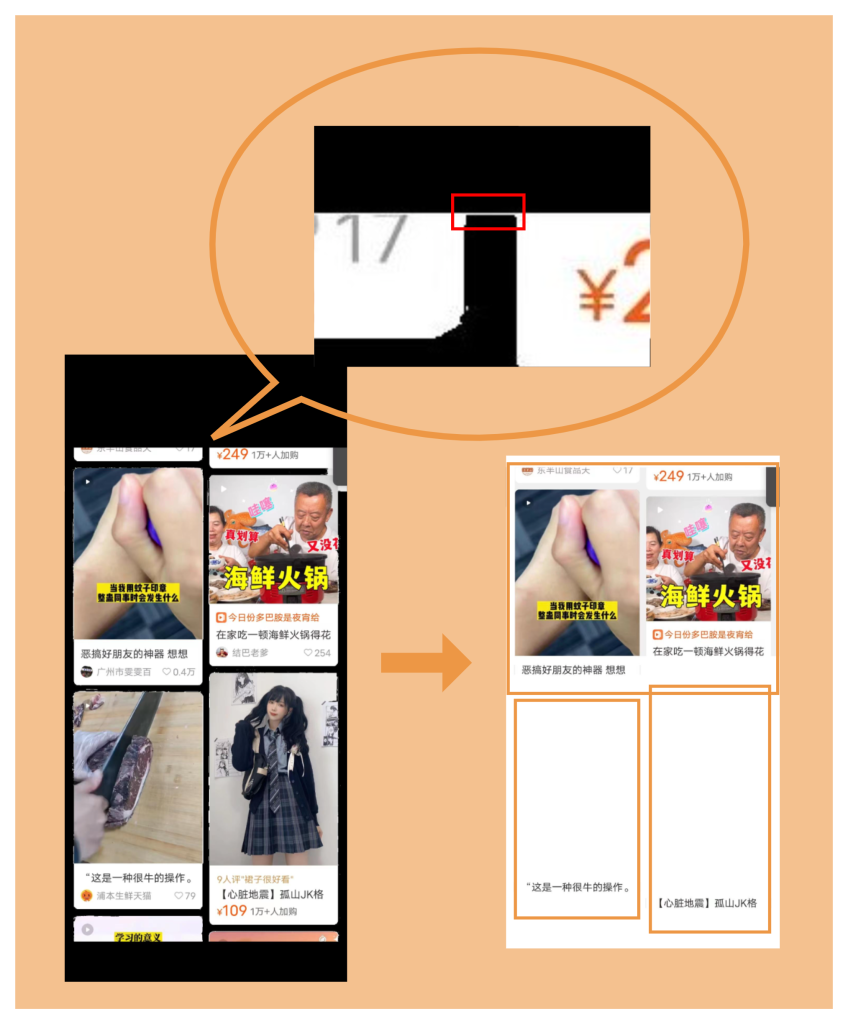
我之前在获取卡片位置的过程中发现,截图上方的多张卡片总是被识别为一张卡片。而中间态处理的截图中我却看到这两张卡片明明是被分开了的。
原因是最上面的两张不完整卡片之间有一行白色像素行把两张连在一起,同时右上角又正好多了一个其他应用产生的黑框。最终就导致在图片预处理的时候,将上面四张卡片识别为一张。
我的解决方法是缩减卡片的判定边界。
对我来说,只要左右卡片不链接在一起就没事。而上下卡片的链接最多会让我损失上面卡片的标题位置,但下面卡片的标题位置我还是能获取到的。
OCR结果中存在吞空格的问题
阿里的OCR服务还是非常靠谱的(虽然也存在官网的Demo跑不通的问题/狗头),并且在我做完图片预处理并让图中只剩下标题的情况下,OCR也能够把所有标题全部识别出来。
OCR的识别结果是通过一个字符串给出的,标题之间用空格隔开。但是如果标题中本身就有空格,并且是连续中文字符之间的空格,那么这个空格有概率不会被识别。
这个对于OCR来说其实也是合理的,只是由于我自己的用途导致这个标题文字结果吞空格的情况有点麻烦。
截图中的时间识别
时间识别比标题时间简单太多了。同样也是做图片预处理,做左上角的像素块截出来给OCR,然后在结果中找到时间文字就好了。目前时间识别的准确率几乎为100%,就不过多折腾了。